 |
Account Login |
Your first C++ Program |
|||
| Introduction: | |||
| In this tutorial you will be introduced to Microsoft Visual C++ and write your very first C++ program. You will also be introduced to several key programming concepts that you will reuse on every program you write. |
|||
| Lets Get Started: | |||
| 1. Start by opening Microsoft Visual C++ Express (you can download it from our software page) | |||
| 2. Click on File -> New -> Project | |||
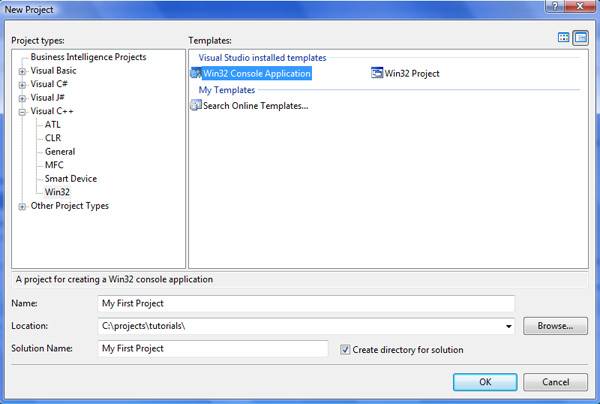
| 3. On the New project Dialog Window select Visual C++ then Win32 from the left hand menu. Then select Win32 Console Application from the list of available templates. Enter a Project name and location then click ok. ***NOTE*** I like to select Create Directory for solution but this is only a preference. ***NOTE*** |
|||
 |
|||
| 4. On the proceeding page click next then check Empty Project and Finish. | |||
| 5. In your solution explorer right click on your project name and and select Add -> New Item (if you can not see the solution explorer you can select View -> Solution Explorer from the file menu bar) |
|||
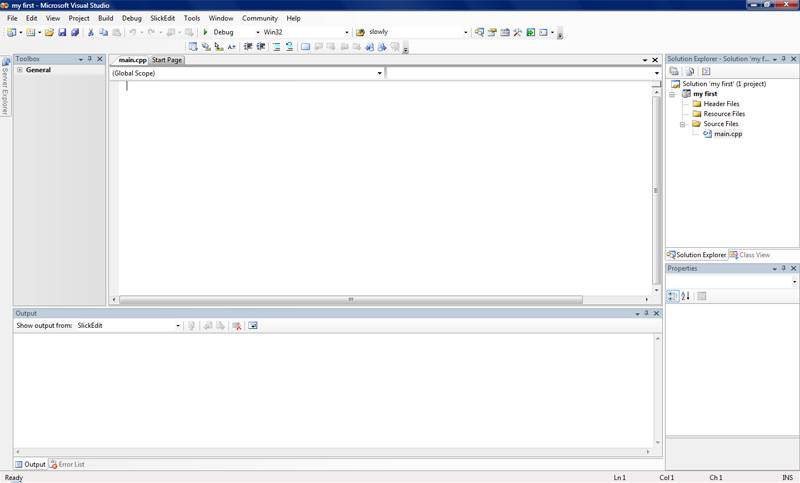
| 6. From the dialog window select Code and C++ File (.cpp), enter a file name such as main.cpp then click add. | |||
| 7. You will now have your main work space available. It should look similar to the below picture. | |||
 |
|||
8. Type in the following code in the window.
|
|||
| 9. Now that we have our program finished we can compile and run it. | |||
| 10. By default your compile key should be F7 or you can select Build -> Build Solution from the file menu. | |||
| 11. By compiling you will see your output window in Visual C++ appear and it should say 0 errors. If you have any errors at this point you will need to double check what you typed and your project settings. This output area will display any compile errors in your code and will provide valuable information to fix your bugs. | |||
| 12. If everything worked then you program is now ready to run. Hit F5 or Debug -> Start Debugging from the file menu. | |||
| 13. You will see a console window open with the text "Hello World" with a line stating press any key to continue. | |||
| You have now built your very first C++ program, but you are a long way from being the Zen Master. To start what does all that code you typed in do. Lets go through a couple of simple structural elements of C++ then we will go line by line of the above code to see what each line does. |
|||
| Include Statements: | |||
| The include statements are used to add an external piece of code to your project. Includes always go at the top of your file. The proper usage is # include <filename> for a file from the standard library or #include "filename.h" for a file local to your program. |
|||
| The Main Function: | |||
| All C++ programs must have this. In a later tutorial we will look further in detail to how a function works, but for now just remember that this is a required part of your program and is where your code execution starts. | |||
| What's with those Curly Braces and Semicolons: | |||
| Ok this is just one of those things you'll have to just do. The curly braces are what you use to define a specific section of code. In you program you have your main function. In the line below you have a opening bracket { then you have several lines of code followed by a closing bracket }. Basically this means that all the code between these braces { } belong the the main function. In C++ you can space things as you like and you will notice when you type in the above code it should auto indent for you. This makes you code more easily read. You will notice that after each line of code you will find a semicolon. This means that this concludes this section of code. Being that C++ ignores extra white space if you were to not have a semicolon the compiler would think the following line belongs to the same section of code. If you try compiling with a missing semicolon you will see an error in the output window. in a small program this is easy to debug, but can be hard to find in a larger program so be sure to end your statements. |
|||
| Using Namespace Statement: | |||
| Ok this is a major time saver. In the sample code you will see the code using namespace std;. This code makes it so that when you want to use a function from the standard library that you do not have to prefix the function call with std::. In the code sample we make use of the the iostream (input/output steam) library from the standard library. If we choose not to use the using namespace statement we would have to prefix our cout<< command like this std::cout<<. ***NOTE*** like many things in C++ you do not have to use this and the compiler will be just fine if you prefer to use the std:: prefix instead. Also if you program does not use anything from the standard library then you would not need this statement ****** | |||
| Line by Line Code Explanation: | |||
| 1. #include <iostream> This line is telling the compiler to include the iostream standard library in our project. This library contains valuable function like cin>> and cout<< that let us print to the console window and capture input from the keyboard. In the next tutorial we will go further in detail of the iostream and some of the functions it has for us to use. |
|||
| 2. using namespace std; This line of code tells the compiler to prefix any of the function calls with std:: that need it. This allows us to use cout<< without having to type std::cout<< every time. See above for more information about the using namespace statements. |
|||
| 3. int main(int argc, char *argv[]) This line is our main function and the starting point for code execution in our program. The code inside the ( ) can be ignored now, but it is used to capture any command line parameters passed into the program. The int in front of main stands for integer and means that the main function must return a integer value. Don't worry if you don't understand that, in the next tutorial we will go over different data types and functions in more detail. |
|||
| 4. { This is the opening bracket for the main function. |
|||
| 5. cout<<"Hello World"<<endl; This statement uses the cout function from the iostream library. This line prints out the words Hello World to the console window then prints a new line with endl. With cout<< you can continue outputting by placing another set of << as seen in the example. We will go over cout and cin in detail in a later tutorial. |
|||
| 6. system("pause"); This line is what displays the prompt press any key to continue in the console window. If you were to exclude this line the program would close directly after it printed the Hello World. Since you are not starting the program in the console the console window closes when the program does, so to see what your working on you must stop the program from exiting. Later on we will be taking keyboard input so this will not be an issue. |
|||
| 7. Return 0; All functions except void functions must return a value, but is not limited to just one return point. When the code execution hits a return it immediately exits the function it is in and returns the value provided (we will discuss more about functions in a later tutorial) This line simply return the number zero back from the main function. While it may not look usefully to have this in the main function this line of code can be very handy. It is very easy to setup multiple return points that will give a different value if the program exits in an unexpected way. This return value can only be seen in your output window in Visual C++ upon exiting the program. |
|||
| 8. } The last line is the closing bracket of the main function. This just tells the compiler that this concludes the section of code that belongs to the main function. |
|||
| Conclusion: | |||
| At this point you have successfully created your first C++ console application in Microsoft Visual C++. You have also seen the basic structure of the main program that will be repeated in every program you write. While this program only displays Hello World it has introduced you to several important structures of the C++ language. You have also had a brief introduction to the iostream library. In the following tutorials you will be learning more about the iostream, variables and functions. With a few more simple techniques you will be able to gather, alter and display information on you screen. |
Home | Tutorials | Articles | Free Software | Advertise With Us | Contact Us
© 2008 All About Coding