 |
Account Login |
Your first C# Program |
|||
| Introduction: | |||
| In this tutorial you will be introduced to Microsoft Visual C# and write your very first C# program. While you can do console development this tutorial will introduce you to windows forms, controls and event driven programming. | |||
| Lets Get Started: | |||
| 1. Start by opening Microsoft Visual C# Express (you can download it from our software page) | |||
| 2. Click on File -> New -> Project | |||
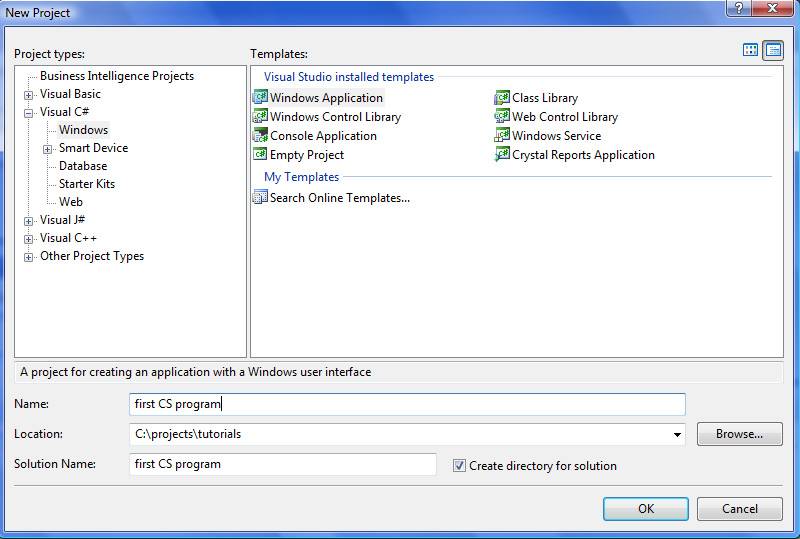
| 3. On the New project Dialog Window select Visual C# then Windows from the left hand menu. Then select Windows Application from the list of available templates. Enter a Project name and location then click ok. ***NOTE*** I like to select Create Directory for solution but this is only a preference. |
|||
 |
|||
| 4. You will find that C# has setup a simple windows form for you. It's usually best to go ahead and rename your forms first. To make this change look in the solution explorer window. You will see a file named Form1.cs, right click on it and select rename, then rename it to frmMain.cs. Now that we have changed the form's file name to something meaningful lets also title our window. To do this click anywhere on our empty form then look in our properties window for a property named Text. Enter in "Our First Program" and as soon as you hit enter you will see that the forms title was changed. | |||
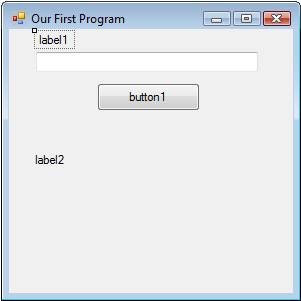
| 5. Now lets add some controls to our new form. Find your toolbox and under common controls select label then draw 2 of them on your form, also draw one textbox and one button. You can follow for the placement of the controls. | |||
 |
|||
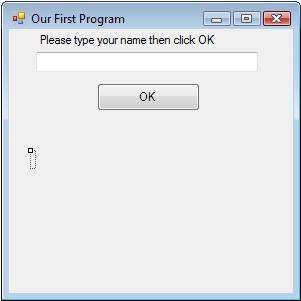
| 6. Anytime you put any controls on your form that you will need to reference in code you should rename it to something meaningful. Our first label is simply to display a message for the user to enter information so we don't really need to name it. Click on Label1 then in the properties window find Text and enter "Please Type your Name then click OK". Next we need to name the textbox to something meaningful so we can access it in code. To do this click on the textbox then in the properties window find the property called NAME. Give it a good name like txtUserName. I like to use prefixes for controls so that in code it is easy to tell what type of control it is. For a text box I used txt, for a label I would use lbl and for a button I would use btn. Go ahead and name our button btnOK and our second label lblMessage. Now we don't want our button or message label displaying their name so for the button change its text property to "OK" and for the label remove all text in the field. Your form should now look something like the following. Don't worry if you cant see you lblMessage it is still there, you can select it by clicking on the form and hitting the tab key until you find it. | |||
 |
|||
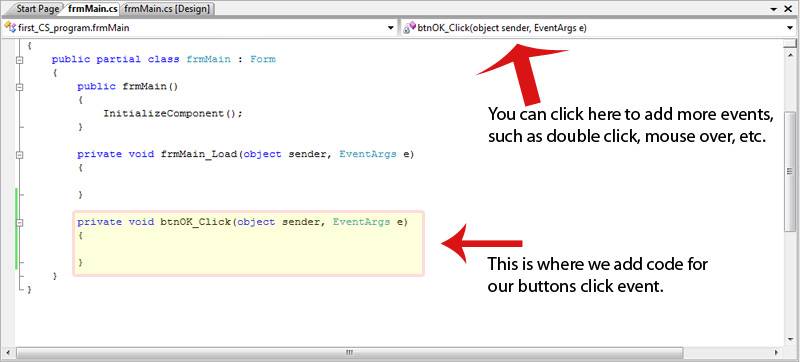
| 7. Now we want to have the program do something when the user hits the OK button. To add code to this button simply double click on it. You will now be taken to the code screen and it will automatically add an event for our buttons click event. You screen should look like the following image. | |||
 |
|||
| 8. What we want to do is when the user clicks the button it will welcome them with a message in the lblMessage. To do this type the following line of code inside the buttons click event. ***NOTE*** I urge you to type this code and not copy and past it. As you start to type you will see the wonderful work Microsoft has put into C#. As you type C# will try and guess what you are wanting to type. When it selects the right thing you can hit the tab key to have it fill it in for you. Also when you type in the period it will list you all the available properties that object has available. | |||
|
|||
| 9. What this line of code does is places the text "Welcome to our first program " followed by what every info the user typed in the textbox into our greeting label. Now would be a good time to go ahead and compile and run our program. By default the key for compile should be F7 but if it isn't you can select Build -> Build Solution from the file menu bar. To run the program you can hit F5 or Debug -> Start Debugging from the file menu bar. Play around with it a little and you will notice that if you do not enter in a name the message is also missing the name. This simply will not do, we need to force the user to enter their name before we display information to them. To do this we are going to add a few more lines of code to our buttons click event. Replace our previous code with the following code then build and run your program again. We will go over the code afterwards. | |||
|
|||
| 10. You should now see that if you do not enter anything in your textbox it will display a message box and does not show our welcome label. Lets take a look at the code. If you have done any C++ before this will all look very familiar. Being that you are reading this tutorial I will assume nothing and we'll start by going over the structure. In C# and C++ regions are defined with { } brackets and all single lines are ended with semicolons. That sounds fairly simple doesn't it? it really is, but you'd be amazed at the times I still forget the semicolon. Don't worry though if you try to compile it will fail and show you your mistake. | |||
| 11. Lets go over the structure of the IF statement. First we start off with the keyword if. Then we put our condition to evaluate in parentheses ( ). Then we place our brackets { } and inside the brackets we place the code we want to run if the condition evaluates to true. The else section does the opposite. Basically it runs this code if the condition evaluates to false. So in our code we are asking if the data in the text property of our textbox is empty. If it is empty we show the message box, and if it has some data there we display our greeting label. |
|||
| 12. Lets go over the message box section now. While there is much more you can do with a message box this is how it works in its simplest form. Using the message box in this way the first text you enter is what message the box will display. The second piece of text is the name that will be displayed at the top of the message box. Like I said there is a lot more you can do with it like telling which buttons to have on it, which icons to display and it can even tell you which button the user hit on the message box. | |||
| Conclusion: | |||
| Well that's about it for this tutorial. Here you have learned how to start up a new C# windows application with a single form, add a few simple controls to it, validate user data, display a message box and display a customized greeting to the user. Wow was that all there? From here I suggest that you extend this program. Add some more controls to your form and see if you can figure out what they can do. |
Home | Tutorials | Articles | Free Software | Advertise With Us | Contact Us
© 2008 All About Coding