 |
Account Login |
Simple Flash Banner |
|
| Introduction: | |
| In this tutorial you will make a simple banner in Flash CS3. You will add images, text, some simple animations and a little ActionScript by the end of this tutorial. If you do not have a copy of flash you can follow the link on our Software page to download a 30 day trial version. This source images and flash files for this tutorial can be downloaded here. |
|
| Let's Get Started: | |
| 1. Open Flash CS3 and you should be presented with a startup screen that lists several items. from the Create New section select Flash File (ActionScript 3.0). If the startup screen does not display you can select File -> New then select Flash File (ActionScript 3.0) from the dialog window and click ok. |
|
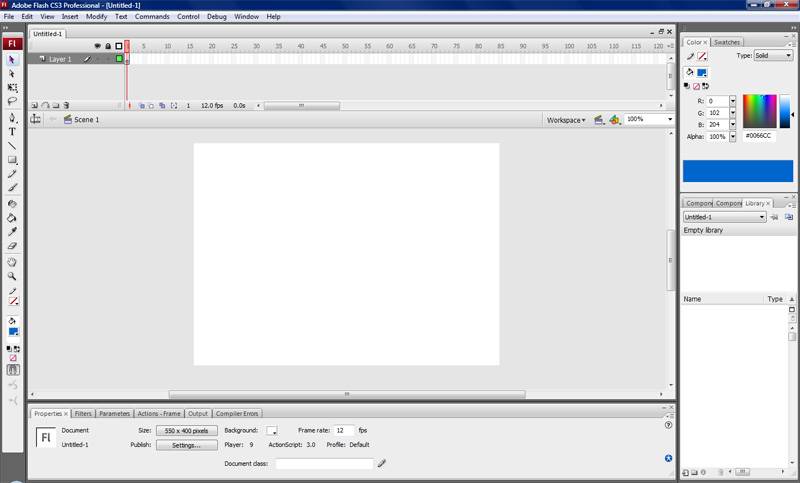
| 2. You will now be at the main work area. The image below should be similar to what you see. You can view/change/add which windows are visible to your desire. |
|
 |
|
| 3. At the bottom of the screen you have your document properties. Most of the time you will want to change the document resolution. For this tutorial 550 x 400 will be just fine. | |
| 4. First lets add an image to the background. To do this click on File -> Import -> Import to Stage. You can alternatively select import to library if you were wanting to add all the images at once. Since we only want to add a single image at the moment and want it directly on the stage select import to stage. Now select the image water.jpg that you will find in the Zip file for this tutorial. (You can import almost any image format including photoshop and illustrator) | |
 |
|
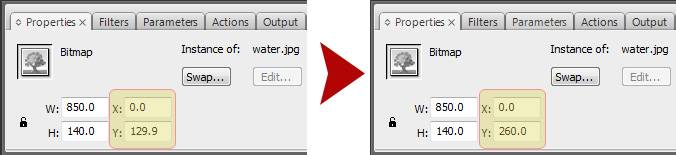
| 5. Now lets set the image to the bottom left corner of your banner. To do this enter the values X = 0 and Y = 260 in your properties window just below your work area. | |
 |
|
| 6. Now lets add two more images to our library. Select File -> Import -> Import to Library. Select sun.jpg and airplane.jpg then click import. Now you will have these two file sitting in you library panel alongside the first image you imported. If you can not see the library panel you can bring it up by hitting Ctrl + L or you can select it from the Windows Menu from the file menu bar. | |
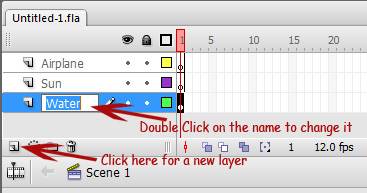
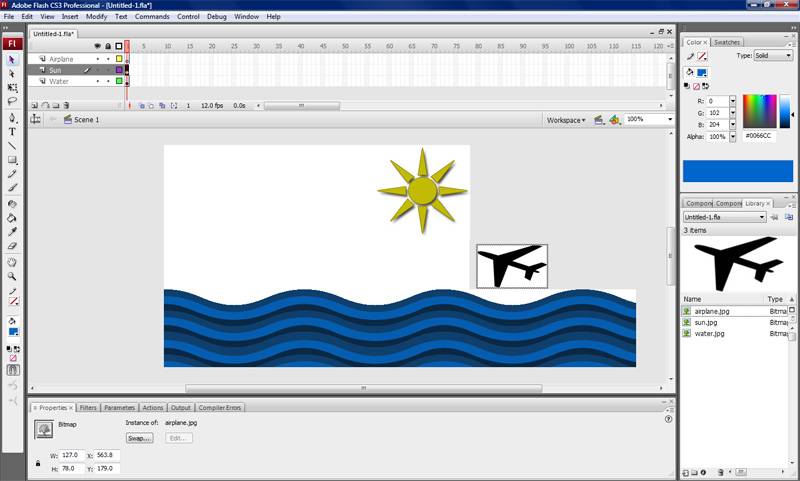
| 7. Now lets get started laying everything out. First lets change the name of Layer 1 to Water. We do this by double clicking on the name "Layer 1" and typing in a new name. Now lets add two new layers and change their names to sun and airplane. To make a new layer click the new layers button just below the layers area. See the picture to find the location. |
|
 |
|
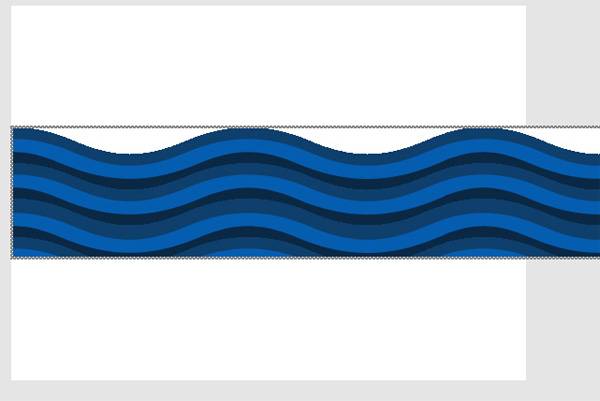
| 8. You will see in the time line directly to the right of the layer names there is a little box and in this box (a key frame) there is a circle. If the circle is empty then there is nothing on that layer at that key frame, if it is full then it means there is something on that layer. You will notice at this point the only thing we have on our banner is the water so it is full and the other two layers are empty. Now that we have our images in the library and we have new layers for them lets add our Sun the the Sun layer and our Airplane the the Airplane layer. To do this first click on a layer to activate it, then drag the image from your library to the working area. Layout the images similar to the following picture. Make sure to have the airplane off to the side of the banner. |
|
 |
|
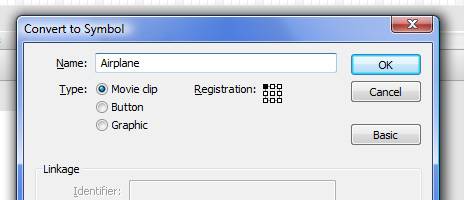
| 9. Ok now that we have the layout finished lets add a little animation. We will be animating the water and the air plane so lets start with the airplane. First click on the airplane layer where you should have place the airplane image. Press the F8 key to convert the image into a symbol. In the dialog box that appears change the name to airplane and select movie clip then click ok. | |
 |
|
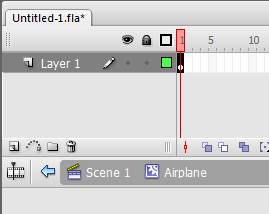
| 10. Now your image of the airplane will have a blue border around it. Double click on inside the blue border to open this movie clip for editing. You will know you are now in the editing mode of this movie clip and not the main movie by looking at the bar directly above you main working area. You will see it say Scene 1 followed by airplane. If it does not say this then you are not editing the airplane clip. You will also see that the layers panel has changed to have a layer 1. This allows you to have multiple layers within this symbol. | |
 |
|
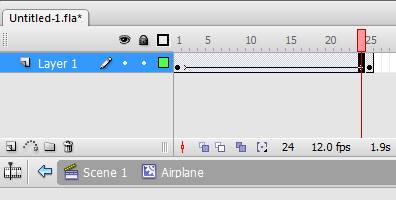
| 11. Now we are going to work with the frames. First we are going to right click on frame space 25 and select insert key frame. The banner will be running at 12 frames per second which will make this animation of the airplane flying across the screen last about 2 seconds. With frame 25 selected drag your airplane from its current location to the other side of your working area. Now here comes the magic. If you were to leave it the way it is the airplane would jump from its starting position to the ending position on frame 25 and you would never see it. Of course we don't want to do this, what we want is for it to fly smoothly across the screen without having to set its location for each frame. To do this we are going to create a tween. The easiest way to do this is to right click on frame 24 and select Create Motion Tween. You will now see a line that goes from frame 1 to frame 24 like the image below. | |
 |
|
| 12. Now would be a good time to test your animation to make sure your animation looks right. To do this you can select Control -> Test Movie from the file menu or just hit Ctrl + Enter. If you need to make any adjustments go back and make them before we move on. | |
| 13. Now that we have animated the airplane lets animate the waves. To go back to the main scene just click on Scene 1 in the bar just below the layers. You should now see your 3 layers again. Like before to animate the water click on that layer and convert it to a symbol by pressing the F8 Key or selecting it from the menus. Call it Water and select movie clip like before. | |
| 14. Double click your water to open up this movie clip and as before lets add a key frame at frame 25. This time we need to be a little more accurate on where we put the water to make it have a smooth animation. Click on frame 25 then click on the image of the water. Now if you will look at the properties window you will see the X and Y locations of the image. To make it flow correctly change the X value to 190. | |
| 15. Save and test you movie again. Now you should see both your airplane and your water animating. If you don't go back and see if you missed a step. | |
| 16. If everything looks right lets go on and finish our banner. Lets add a little text to our slide now. To do this lets first make a new layer to hold it. If you can't remember how to do this look up a little bit in this tutorial. Now that you have a new layer go ahead and name it text. It is a good practice to name you layers to something meaningfully. On a small project like this it's not that important, but as the project size grows it helps keep things in order. | |
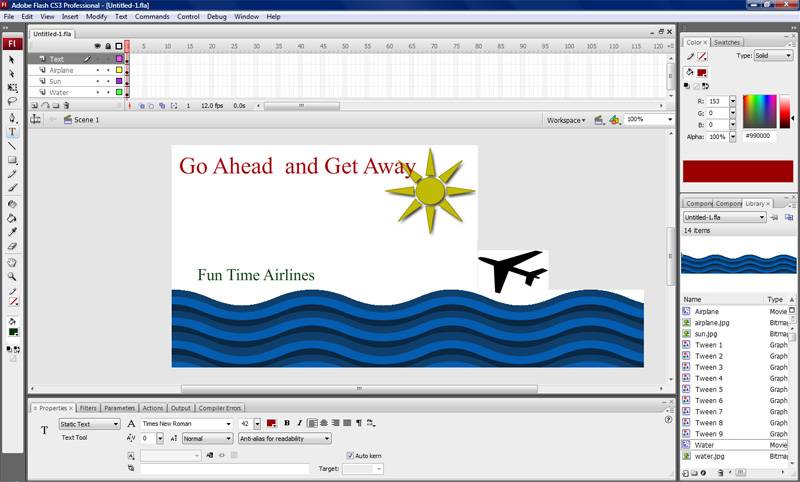
| 17. Now lets select the Text tool from the tool bar. The text tool looks like a Capital T. Now you can click on your stage and start typing. You will find in the properties window all your common text tools like Font, Size and color. Here i make two different text pieces on the text layer. The first one says "Go Ahead and Get Away" and the second one says "Fun Time Airlines". Your project now should look like this. | |
 |
|
| 18. The last thing you are going to want to do is to make this banner to when clicked go to the URL of the site that it advertises. To do this make a new layer and name it button. | |
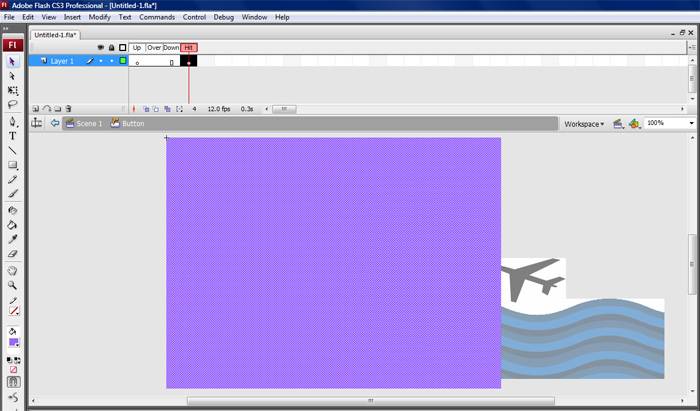
| 19. Now select your rectangle tool from the tool bar. This looks like a little box and is just below the test tool. click and drag a rectangle over the entire area of the banner. Its ok to have a little overlapping as it will not be seen in the end. Now click on your button layer and hit F8 to convert your rectangle to a symbol. This time however select button instead of movie. | |
| 20. Now reselect you primary selection tool. (is the arrow cursor at the top of the tool bar) Now double click the rectangle to open it up in editing mode. Unlike the movie clips you will now see button specific frames. Being that we don't want to have the button vi sable click on the first frame named Up and drag the frame to Hit. When you have done this it should look like this screen shot. | |
 |
|
| 21. Almost done now all we need to do is add the action to the button. Before we can reference any item in code we must first give its instance a unique name. To do this simply select the rectangle and in the properties window type in a name for the button. I used "myButton" for the name. Make sure you are in the main scene and not in the buttons editing mode. | |
| 22. We are now going to make one more new layer and call it Script. Click on the first frame of this new layer and open the Actions Window. You can do this by selecting Window -> Actions from the file menu bar. You can now type or copy the following code into the action script text box. | |
|
|
| 23. Basically what we are doing here is telling Flash to be on the look out for click event on our button and when it get one then to execute the function called buttonClickHandler. In our function we are telling flash to open a new window and navigate to our URL. Make sure that you type in the names exactly as you named them as the code is case sensitive. | |
| Conclusion: | |
| Your Done! You have now completed your first Flash banner. While not very eye appealing it has showed you how to do many things. Now you should be able to add images, make simple animations, and even add a little bit of action script. |
Home | Tutorials | Articles | Free Software | Advertise With Us | Contact Us
© 2008 All About Coding